One of the tasks I’ve taken on in the Monero community is maintaining support for Monero in BTCPay Server, and I’ve realized that due to the Bitcoin focus of BTCPay Server the docs are less than ideal for Monero acceptance.
In order to help improve that, I figured I’d spin up a BTCPay Server instance for my own use and build a guide out of the process, so hopefully this will aid others wanting to accept Monero at their stores, for donations, or any other use-case get up and rolling with BTCPay Server!
For this guide I will assume you’re running Ubuntu 20.04+ on a local machine or VPS, but much of the guide will easily translate to other popular Linux distributions.
A big thank you for a lot of help to Mike Olthoff of CoinCards and for a lot of material pulled from his WIP guide on Github
Recommended hardware
- Pruned Node (the default Monero node type for BTCPay Server)1
- 2+ vCPUs/cores
- 4GB+ RAM
- 100GB+ SSD
- ~25GB are required for the pruned Bitcoin node, and ~50GB for the pruned Monero node
Why use BTCPay Server to accept Monero?
While there are quite a few options out there for accepting Monero as a merchant, BTCPay Server remains one of the best options for merchants due to it’s complete self-sovereignty, the easy acceptance of other cryptocurrencies (like Bitcoin or Lightning), and the ability to simply spin it up.
The wide support for BTCPay Server also leads to it having many well-maintained plugins for common eCommerce platforms and you can even enable awesome additional features like automatic conversion to Monero from other assets via SideShift or Fixedfloat.
Initial Hardening via UFW
We will want to make sure that the system is hardened in a simple way by making sure that the firewall is locked down to only allow access to the ports necessary for SSH and BTCPay Server, using UFW.
A great intro to getting started with UFW is available on DigitalOcean.
Run the following commands to add some basic UFW rules and enable the firewall:
| |
Get a domain for your instance
In order to use BTCPay Server, you’ll need a custom domain you want to use for the instance.
I recommend purchasing a domain via Njalla or 1984.is, pay in Bitcoin/Monero, and then add an entry for the public IP address of your network/VPS with the subdomain you’d like.
I, for instance, use btcpay.sethforprivacy.com for hosting mine.
Prepare for installing BTCPay Server
For the official documentation, refer to “Full installation (for technical users)” - docs.btcpayserver.org
Thankfully BTCPay Server makes this step extremely easy and has great documentation, so all you need to do to get the necessary files for BTCPay Server is as follows:
This will create the necessary folders in the home directory of your root user and get you in the correct directory to configure and install BTCPay Server.
Configuring BTCPay Server with Monero support
This guide will assume you want to accept Bitcoin as well as Monero (as that is the most common reason for choosing BTCPay Server over Monero-only payment processors), but feel free to use the collapsed configuration below if you just want to accept Monero.
In order to properly configure BTCPay Server you use something called “environment variables” to set the necessary options before installing and starting the server.
Be sure to replace btcpay.EXAMPLE.com with the domain you setup previously!
| |
If you want to also accept Lightning Network transactions, just add this command to the above:
export BTCPAYGEN_LIGHTNING="clightning"
To only enable Monero support, click the arrow to expand the configuration below:
Only Monero support
 1
 2
 3
 4
 5
 6
 7
 8
 9
10
11
12
13
14
15
16
# Run btcpay-setup.sh with the right parameters
# Set the custom domain you chose to use
export BTCPAY_HOST="btcpay.EXAMPLE.com"

# Enable Monero support
export BTCPAYGEN_CRYPTO1="xmr"

# opt-save-storage-xs (opens new window)will keep around 3 months of blocks (prune BTC for 25 GB)
# opt-add-tor enables Tor support for the UI and Bitcoin node
export BTCPAYGEN_ADDITIONAL_FRAGMENTS="opt-add-tor"

# Enable automatic HTTPS reverse proxy + SSL certs via Nginx and LetsEncrypt
export BTCPAYGEN_REVERSEPROXY="nginx"

# Allows you to manage the BTCPay Server install from the web UI, update, etc.
export BTCPAY_ENABLE_SSH=true
Configuring and installing BTCPay Server
This step is incredibly simple, as the script included with the BTCPay Server repo will download and install all of the necessary packages and Docker images you need to run for BTCPay Server.
| |
This will:
- Install Docker
- Install Docker-Compose
- Make sure BTCPay starts at reboot via upstart or systemd
- Setup environment variables to use BTCPay utilities
- Add BTCPay utilities in /usr/bin
- Start BTCPay Server
Assuming all went well, you should now be able to navigate to your new BTCPay Server at the domain you chose earlier!
Create an account and a store
The first thing you’ll need to do is create an account on your new instance – be sure to use a secure email and strong password (hopefully via a password manager like Bitwarden!) – so that you can create stores, manage wallets, etc.
Follow the official docs to do so here: Register account - docs.btcpayserver.org
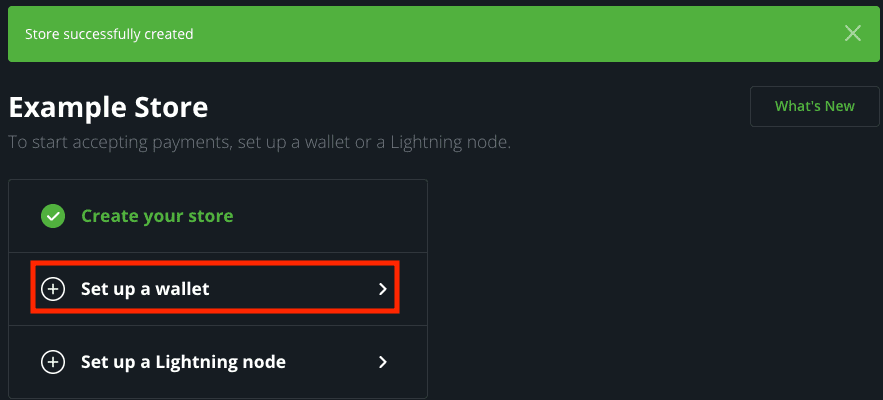
Once you’re logged in, you’ll want to go ahead and create a store to manage wallets, invoices, etc. for the given store.
Follow the official docs to do so here: Create a store - docs.btcpayserver.org
Setup your Bitcoin and Monero wallets
Configure the Bitcoin wallet of choice
Skip these steps if you’re only accepting Monero on your store!
- Select “Setup a wallet” and select the preferred wallet option to setup your Bitcoin wallet
Follow the official docs to do so here: Wallet Setup - docs.btcpayserver.org
Create a view-only Monero wallet via Feather Wallet
- Download Feather Wallet here: Feather: a free Monero desktop wallet
- Create a new Monero wallet (skip to step 3 if you have an existing wallet you’d like to use instead)
- Choose “Create new wallet”

- SAVE YOUR SEED!

- Name your wallet as you see fit

- Set a strong password for your wallet

- Choose “Create new wallet”
- Create a view-only wallet out of the new wallet for use in BTCPay Server
- Select “Wallet” and then “View-only” in the top bar

- Select “Create view-only wallet”

- Name the view-only wallet as desired and select “Save”
- P.S. - I like to put “view_only” or similar in the wallet to make sure I use the correct files later on

- P.S. - I like to put “view_only” or similar in the wallet to make sure I use the correct files later on
- Set a strong password for your view-only wallet

- Done!

- Select “Wallet” and then “View-only” in the top bar
- Make a note of the location you stored the view-only wallet in, as we’ll need to upload those files to BTCPay Server in the next step
Add the view-only wallet to BTCPay Server
- Go to “Settings” to configure your Monero wallet

- Select the “Monero” option, and then “Modify” next to the wallet

- Upload the Monero view-only wallet file and keys to the respective options in the “Monero” wallet options (along with the wallet password, if set)
- These files are usually stored in your user directory under the “Monero” folder in a “wallets” folder, i.e.
/home/sethforprivacy/Monero/wallets/
- These files are usually stored in your user directory under the “Monero” folder in a “wallets” folder, i.e.
- Check the “Enable” box, and hit save
Now just wait for the Bitcoin and Monero nodes to sync, and you should be all set!
P.S. – if you ever need to replace the Monero wallet with another one, you cannot do it through the UI and must run this command:
| |
Once you’ve run that you can then upload new wallet files as you did during the initial setup.
Using your BTCPay Server instance
Thankfully the docs for using BTCPay Server are excellent and all apply exactly the same way to Monero as to Bitcoin usage:
User Guide - docs.btcpayserver.org
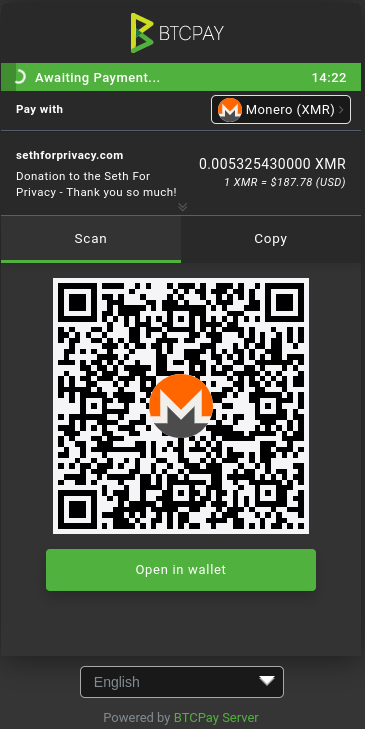
When a user is prompted to pay an invoice, now they can select Monero from the dropdown and pay without any extra hoops or unique back-ends! An invoice in Monero looks like this to customers/donors:
Contributing to Monero support in BTCPay Server
If you’d like to contribute and improve Monero support within BTCPay Server, here are the relevent repositories:
- btcpayserver
- This directory controls the front-end and BTCPay Server interactions with the Monero node and wallet
- btcpayserver-docker
- Specifically this file: monero.yaml
- This file controls the way that the Monero Docker containers are started and managed
- dockerfile-deps
- Specifically this directory: Monero
- The two
.Dockerfilefiles are what the Monero node and wallet Docker images are built from, and thenotifier.shscript is used to notify the BTCPay Server process when a transaction is received that satisfies an invoice
Key areas that need improvement:
- You cannot use distinct wallets per store/use, only one per server
- Removing this limitation would allow for “Uncle Jim” BTCPay Server instances that are hosted by trusted friends/family/community members that other’s can leverage for their stores without needing to host BTCPay Server themselves
- You cannot replace/remove the Monero wallet/keys files without a manual deletion of them via CLI
- Improving this would allow much simpler migration to new wallets, replacing wallets that are no longer wanted, etc.
- Monero acceptance relies solely on the Kraken API
- Allowing alternate APIs to be used, even just as fall-back APIs to gather price data would allow shop owners to continue accepting Monero for payments even if Kraken’s API is unavailable
Troubleshooting
Fixing issues with permissions on BTCPay Server Monero daemons
A recent change to monerod makes it write SSL certs to disk in its data directory, something that can fail if the permissions on the data directory are incorrect. You can follow the steps here to correct those issues and get monerod back up and running.
From the monerod container
Exec into monerod container
List permissions on cert files
| |
Set proper permissions
Verify proper permissions
| |
If there are no cert files present
If there are no cert files present already, you will need to fix permissions on the directory itself so monerod can create the new files:
| |
From the host OS
List permissions on cert files
| |
Set proper permissions
| |
Verify proper permissions
| |
If there are no cert files present
If there are no cert files present already, you will need to fix permissions on the directory itself so monerod can create the new files:
| |
Other notes
- If you can’t exec into the container because it’s crashing, you can do the same on the local filesystem by finding the bind mounted folder, likely
/var/lib/docker/volumes/generated_xmr_data/_dataand performing the steps above on it from the host OS - If you get a permission error trying to set permissions above, make sure to run the
chmodandchowncommands assudo
Replacing Monero view-only wallet files
Occasionally you can run into issues with the Monero wallet files being corrupted or having incorrect permissions, or you simply want to migrate to a new wallet which unfortunately must be done manually for now.
Delete all current wallet files
NOTE: Be sure you do not need these wallet files before performing this step!
| |
Upload new wallet files and password file
Place the new wallet files on the host OS file system, and then do the following (replace the first set of filenames if yours do not match):
You also need to set the wallet password via a password file:
Set permissions on the new wallet files
You may also need to restart BTCPay or the Monero wallet container, but usually it should work without that. If not, you can restart the wallet container with:
| |
Conclusion
A huge, huge thank you to the contributors who have made BTCPay Server possible and who continue to improve it, and to those in the space contributing financially to the project to ensure it continues to grow.
Such a powerful payment processor having solid Monero support is a huge win, and I hope more merchants will start to use BTCPay Server for accepting Monero (and Bitcoin!) ASAP.
As always, if you have any questions from this post or would like more information on accepting Monero as a merchant or using BTCPay Server, please reach out via Signal, SimpleX, X, or Nostr.
A pruned node allows you to run your own Monero node without requiring as much disk space. Please see the pruning Moneropedia entry for more info. ↩︎