Info
While this guide is still useful for those who want to mine on multiple machines or “Uncle Jim” p2pool mining for others, if you just have a single machine to mine on I’d recommend using Gupax instead. Gupax is a FANTASTIC all-in-one Monero mining app for desktop that simplifies the entire process.
NOTE: Much of the beginning of this guide is taken from my related guide, “Run a Monero Node”, but is necessary here as running your own node is usually required for p2pool usage.
This guide will aim to make it very simple and straightforward for you to start and run your own Monero node and p2pool instance for decentralized and fee-less mining of Monero. p2pool is a huge breakthrough that allows individual miners full control over the mining process, removing trust in pools and pool operators and allowing anyone to mine in a decentralized fashion while keeping payout variance down as opposed to solo mining.
Note that once you have this up and running on a VPS or personal hardware, you will want to mine against your p2pool node as the “pool” in your mining configuration. For more on mining Monero generally, including setting up XMRig, see my other guide, “Mining Monero”.
For more information on why you would want to use p2pool instead of a normal pool for mining, please see: Why run and mine on p2pool instead of a “normal” Monero pool?
NOTE: If you’re attempting to run p2pool on Windows, see the following two guides/videos on how to do that. This guide focuses on Linux usage.
Pre-requisites
I will assume in this guide that you have purchased and SSH’d into the VPS/host of your choosing, but if you need help with those first steps here are a few good links to follow:
- Hosting services accepting Monero
- These are some options available for hosting a VPS while paying with Monero, and each come with pro’s and con’s.
- Joe’s Datacenter
- A solid and cheap VPS and dedicated server provider based out of the US, they accept Bitcoin but do not accept Monero (yet!) and are a great choice for a high-performance node.
- Simple Linode deployment guide
- If you use Linode, please consider using my referral link so we both get free credits.
If you’re using your own hardware at home, this guide will still generally apply to you assuming you are running Ubuntu/Debian.
Recommended hardware
- Pruned Node1
- 2+ vCPUs/cores
- 4GB+ RAM
- 75GB+ SSD
Why run your own Monero node?
The Monero network relies on a distributed web of Monero nodes, each of which validate transactions, propagate transactions to the rest of the network, and helps new nodes easily and quickly synchronize to the current state of the network.
Running a Monero node for yourself not only helps to give you the stronger network-level privacy guarantees, but also helps to increase the decentralization, stability, and speed of the Monero network.
Each node can expose two different services, each of which has a positive impact on the network in a unique way:
- Peer-to-Peer (p2p) port (default 18080): this port allows other nodes on the network to connect to your node to download the blockchain and to send you any transactions they validate that you do not yet have. It also increases overall network privacy, as your node participates in the Dandelion++ propagation of transactions.
- Remote Procedure Call (RPC) port (default 18089 for restricted): Exposing this port (especially with the
public-nodearg) allows other users on the network, especially those using mobile wallets or the GUI wallet in “Simple” mode, to connect to your node to sync their wallets, without needing to run their own full node locally.
You can choose to either setup a node via systemd and binaries or deploy monerod as a Docker container below.
Deploying via Docker has a few key benefits, namely a simple and cross-OS compatible install along with automatic updates via Watchtower.
Why run and mine on p2pool instead of a “normal” Monero pool?
Mining on Monero has always been one of the most decentralized PoW networks in the cryptocurrency space, but an issue that has plagued Monero (and all other PoW cryptocurrencies) is that even if miners themselves are numerous and diverse geographically, pools used by those miners are generally very few, geographically similar, and entirely centralized.
The pool operator of a normal mining pool controls the block template produced by all of the miners pointing to it, allowing them to leverage the hashrate for nefarious purposes if they so choose. Normal pools are also custodians of funds as all mined funds are sent first to the pool, and then the pool (hopefully) pays out from those funds to miners according to their work.
Pools and their operators are one of the most vulnerable aspects of Monero mining, but thankfully the Monero community (particularly sech1 [also known as SChernykh]) have built out a p2pool implementation, from scratch, with many improvements over past attempts at p2pool on Bitcoin and other blockchains.
Running p2pool allows you to participate in a second blockchain that is used to decentralize the normal pool functionality, while contributing work as a whole to the main Monero network.
For more details on p2pool and why you should use it, see this knowledge article from LocalMonero:
Update and install required packages
Install a few tools we will need later:
Install Docker:
Install Docker Compose:
Note: This command downloads a script and runs as root directly from Docker. Please make sure you are comfortable doing this, and be wary of doing this on a personal computer. If you’d like to avoid that, please follow the official docs here to install from the repository.
Initial hardening via UFW
We will want to make sure that the system is hardened in a simple way by making sure that the firewall is locked down to only allow access to the ports necessary for SSH and monerod, using UFW.
A great intro to getting started with UFW is available on DigitalOcean.
Run the following commands to add some basic UFW rules and enable the firewall:
| |
Download and run monerod and p2pool via Docker
This section will use a simple Docker Compose configuration file that tells Docker exactly how each part needs to be configured and connected together.
This allows us to simplify down the launch of monerod and p2pool down to a few simple commands.
If you would like to inspect the source code behind the image used here or build it yourself, please see the below links:
Copy and paste the below configuration file wherever you would like on the host, for this guide I will use
~/p2pool:To escape from the nano shell and save the file, hit
ctrl+x.1 2 3 4 5 6 7 8 9 10 11 12 13 14 15 16 17 18 19 20 21 22 23 24 25 26 27 28 29 30 31 32 33 34 35 36 37 38 39 40 41 42 43 44 45 46 47 48 49 50 51 52 53 54 55 56 57 58 59 60 61version: '3.5' services: monerod: image: ghcr.io/sethforprivacy/simple-monerod:latest restart: unless-stopped container_name: monerod volumes: - bitmonero:/home/monero ports: - 18080:18080 - 18084:18084 - 18089:18089 command: >- --rpc-restricted-bind-ip=0.0.0.0 --rpc-restricted-bind-port=18089 --public-node --no-igd --enable-dns-blocklist --prune-blockchain --zmq-pub=tcp://0.0.0.0:18084 --in-peers=50 --out-peers=50 p2pool: image: ghcr.io/sethforprivacy/p2pool:latest restart: unless-stopped container_name: p2pool tty: true stdin_open: true volumes: - p2pool-data:/home/p2pool - /dev/hugepages:/dev/hugepages:rw ports: - 3333:3333 - 37889:37889 command: >- --wallet "468ydghFfthE3UTc53eF5MP9UyrMcUiAHP5kizVYJsej5XGaXBoAAEzUHCcUF7t3E3RrYAX8Rs1ujhBdcvMpZSbH8qkb55R" --stratum "0.0.0.0:3333" --p2p "0.0.0.0:37889" --zmq-port "18084" --loglevel "0" --addpeers "65.21.227.114:37889,node.sethforprivacy.com:37889" --host "monerod" --rpc-port "18089" tor: image: ghcr.io/sethforprivacy/tor:latest container_name: tor restart: unless-stopped links: - monerod - p2pool environment: MONEROD_TOR_SERVICE_HOSTS: 18089:monerod:18089 MONEROD_TOR_SERVICE_VERSION: '3' P2POOL_TOR_SERVICE_HOSTS: 3333:p2pool:3333 P2POOL_TOR_SERVICE_VERSION: '3' volumes: - tor-keys:/var/lib/tor/hidden_service/ watchtower: image: containrrr/watchtower:latest container_name: watchtower restart: unless-stopped volumes: - "/var/run/docker.sock:/var/run/docker.sock" volumes: bitmonero: tor-keys: p2pool-data:NOTE: Be sure to replace the Monero address (468y…b55R) with your own primary address (an address starting with 4), or else you’ll be making generous hashrate donations to me!
If you’d like to use the smaller side-chain (which will allow faster shares but less commonly found blocks, rewards over time will be roughly equal!), you can simple add
--miniin thecommand:section of the p2pool service like so:Explanations of the containers used in the above
docker-compose.ymlfile:monerod: The Monero daemon is the process that connects to the Monero blockchain, synchronizes with other nodes on the network, and validates and keeps track of transactions happening in the Monero blockchain.p2pool: The p2pool daemon connects tomonerodfor Monero’s blockchain data needed for mining, and connects to the p2pool blockchain for synchronization and publishing work you accomplish via mining.tor: This is a container that publishes yourmonerodandp2pooldaemons as Tor Hidden Services if you want to connect to them via Tor directly. Feel free to remove this section if that is not something you’re interested in.watchtower: This container keeps an eye out for new images for all other running containers, updating them immediately when new images are available. This container will ensure you never need to manually upgrademonerodorp2pool, and will always be running the latest versions.
Set huge pages for
monerodandp2poolNOTE: If you have a host with little memory or have issues booting after applying the above, try replacing “3072” with “1168” to reduce the hugepages size.
Start
monerodand allow it to sync fully:monerodcan take anywhere from 4-6h to a few days to sync fully, depending on your hardware.If you have any more questions about the
monerodportion of this, please see my guide at “Run a Monero Node”.Replace
--walletaddress with your own indocker-compose.ymlNOTE: Be sure to create a new wallet for using with p2pool to preserve your privacy, and only use a “standard” address starting with a 4, subaddresses are not supported.
Once
monerodis fully synced, start up the other servicesWatch the logs of p2pool to ensure it started and is synchronizing properly
You should see lines like
SideChain verified block, and after a few minutes of syncing you should see a line likeSideChain new chain tip.
If you already run a Monero node
If you already run a node and don’t want to migrate to this Docker Compose setup, simply add the flag --zmq-pub tcp://0.0.0.0:18084 to your monerod instance and restart it, forward port 18084/tcp, and then use the below docker-compose file and replace the --host value with the IP or DNS address of your existing node:
To escape from the nano shell and save the file, hit ctrl+x.
docker-compose.yml
1
2
3
4
5
6
7
8
9
10
11
12
13
14
15
16
17
18
19
20
21
22
23
24
25
26
27
28
29
30
31
32
33
34
35
36
37
38
39
40
41
42
version: '3.5'
services:
  p2pool:
    image: ghcr.io/sethforprivacy/p2pool:latest
    restart: unless-stopped
    container_name: p2pool
    tty: true
    stdin_open: true
    volumes:
    - p2pool-data:/home/p2pool
    - /dev/hugepages:/dev/hugepages:rw
    ports:
    - 3333:3333
    - 37889:37889
    command: >-
      --wallet "468ydghFfthE3UTc53eF5MP9UyrMcUiAHP5kizVYJsej5XGaXBoAAEzUHCcUF7t3E3RrYAX8Rs1ujhBdcvMpZSbH8qkb55R"
      --stratum "0.0.0.0:3333" --p2p "0.0.0.0:37889"
      --loglevel "0" --addpeers "65.21.227.114:37889,node.sethforprivacy.com:37889"
      --host "monerod" --rpc-port "18089"

  tor:
    image: ghcr.io/sethforprivacy/tor:latest
    container_name: tor
    restart: unless-stopped
    links:
        - p2pool
    environment:
        P2POOL_TOR_SERVICE_HOSTS: 3333:p2pool:3333
        P2POOL_TOR_SERVICE_VERSION: '3'
    volumes:
        - tor-keys:/var/lib/tor/hidden_service/

  watchtower:
    image: containrrr/watchtower:latest
    container_name: watchtower
    restart: unless-stopped
    volumes:
        - "/var/run/docker.sock:/var/run/docker.sock"

volumes:
  tor-keys:
  p2pool-data:
NOTE: Be sure to replace the Monero address (468y…b55R) with your own primary address (an address starting with 4), or else you’ll be making generous hashrate donations to me!
Once you’ve created the above file, start at step 4 in the section above.
Connect your miners to p2pool
Now that monerod and p2pool are up and running, all that’s left is to point your miners over to the new p2pool server you just spun up!
To do that on XMRig, simply run the following command while replacing the 127.0.0.1 address with the IP address/DNS address of the p2pool node/VPS you’re running it on:
| |
If you want to use a configuration file with XMRig, you can use the below configuration file while replacing the 127.0.0.1 address with the IP address/DNS address of the p2pool node/VPS you’re running it on:
For more details on miner configuration, see my guide “Mining Monero”.
Viewing your mining stats
As there is no standard pool for you to use to check your statistics, you may be wondering how you can see your pool-side hashrate in total, shares found, accumulated approximate reward, etc.
The easiest way to check your statistics is to use a community-run website, p2pool.observer, and enter your payout address to view statistics, shares, payouts, etc.
If you don’t want to enter your address into website, you can also use the p2pool node itself to check statistics.
Thanks to DataHoarder on Matrix/IRC for the tip on how to do this!
To check your current statistics via your own p2pool node, simply attach to the containers console, run status, and view the output:
You’ll see information like this displayed on your screen:
| |
To disconnect from the console you need to do two keyboard commands in this order:
Control + P
Control + Q
This signals to the Docker console that you want to disconnect without killing the running p2pool process.
Payouts
Checking payouts
The easiest way to check your payouts is to use a community-run website, p2pool.observer, and enter your payout address to view statistics, shares, payouts, etc.
If you don’t want to enter your address into website, simply watch the wallet in your favorite Monero wallet like Cake Wallet or Monerujo.
To view general pool statistics for the current mainnet p2pool instance, see https://p2pool.io/.
Handling payouts
One of the great features of p2pool is that when you earn Monero you get paid out in every block found during the 6h window.
However, this does lead to a lot of outputs in your wallet, and there are some specific things you need to keep in mind when spending from a wallet that has many (read: hundreds) of outputs from p2pool mining.
Nodes using restricted RPC for wallet access (as most do and should) have a limit on the number of outputs you can send in a single transaction to prevent spam or attacks on the node.
To work around this, you can take one of the following approaches
The easiest way to send funds from the wallet is to use an unrestricted RPC node – ideally, either the same computer as your node, or using the Monero GUI wallet w/ integrated node
- Once you’re using an unrestricted node, you can sweep as many outputs as you want at once (max ~194 per transaction) without issues
If you want to use your own node as an unrestricted RPC node on another host on your local network, you can enable unrestricted RPC by adding these two flags and allowing port
18081/tcpthrough the local firewall of the host the node is running on:--rpc-bind-ip=0.0.0.0 --confirm-external-bind
If you don’t have a local unrestricted RPC node, you can instead manually sweep small amounts of outputs using Feather Wallet or the Monero CLI wallet
It’s important to remember to never expose unrestricted RPC to the internet. If you run a node at home that you want to use for p2pool sweeping, be sure to not forward port 18081/tcp to that host and only access it internally.
Sweeping all payouts with Feather Wallet
My preferred way to actually sweep all of the payouts into larger outputs is using Feather Wallet, my favorite desktop wallet for Monero, and an unrestricted RPC node on my home network.
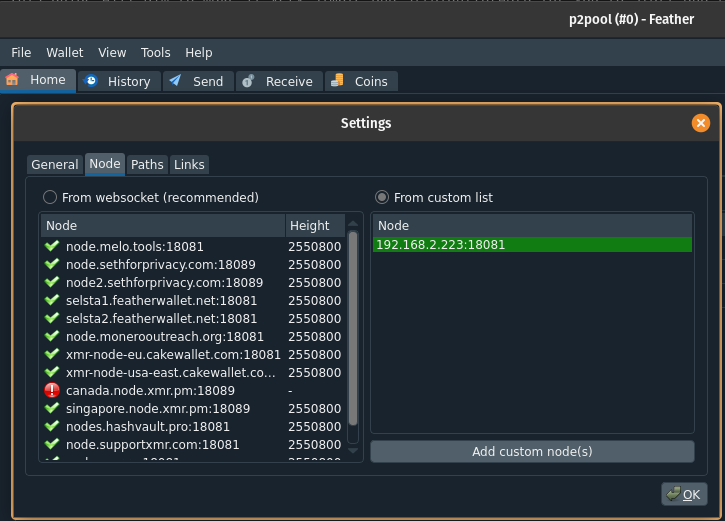
- Start by setting the node in-use to your local unrestricted RPC node under File>Settings>Node and adding your own node to the custom list:

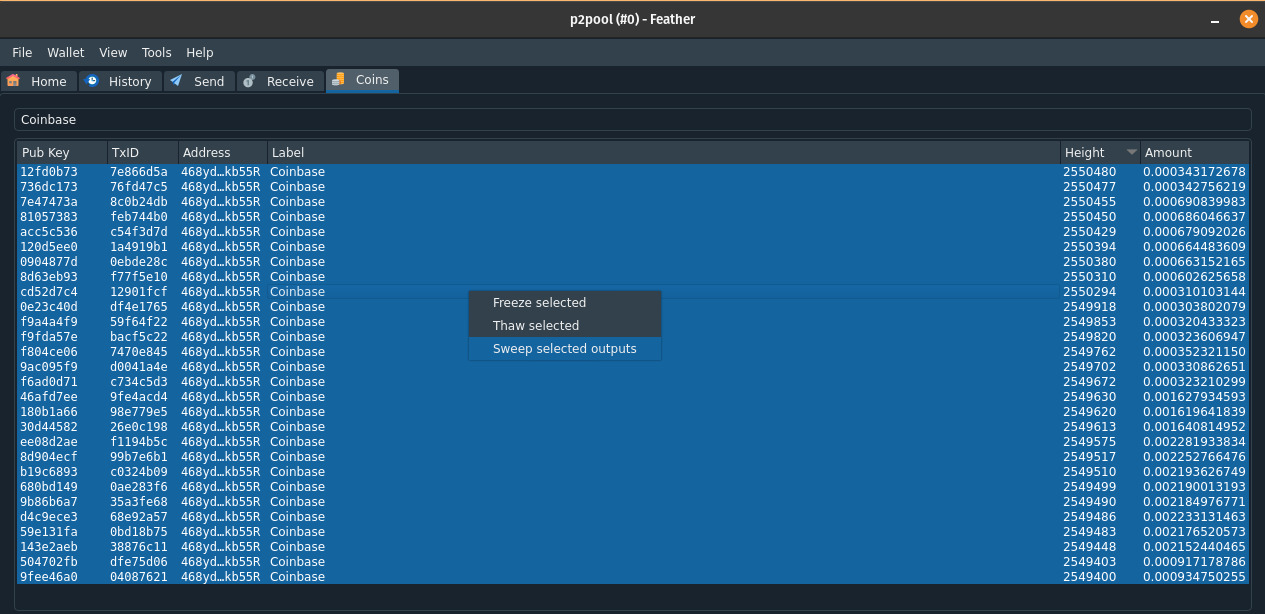
- Go to the Coins tab (enable it in View if necessary) and search for “Coinbase” (this will limit the coins displayed to only those that are p2pool/mining rewards), select all, right click, and select “Sweep selected outputs”

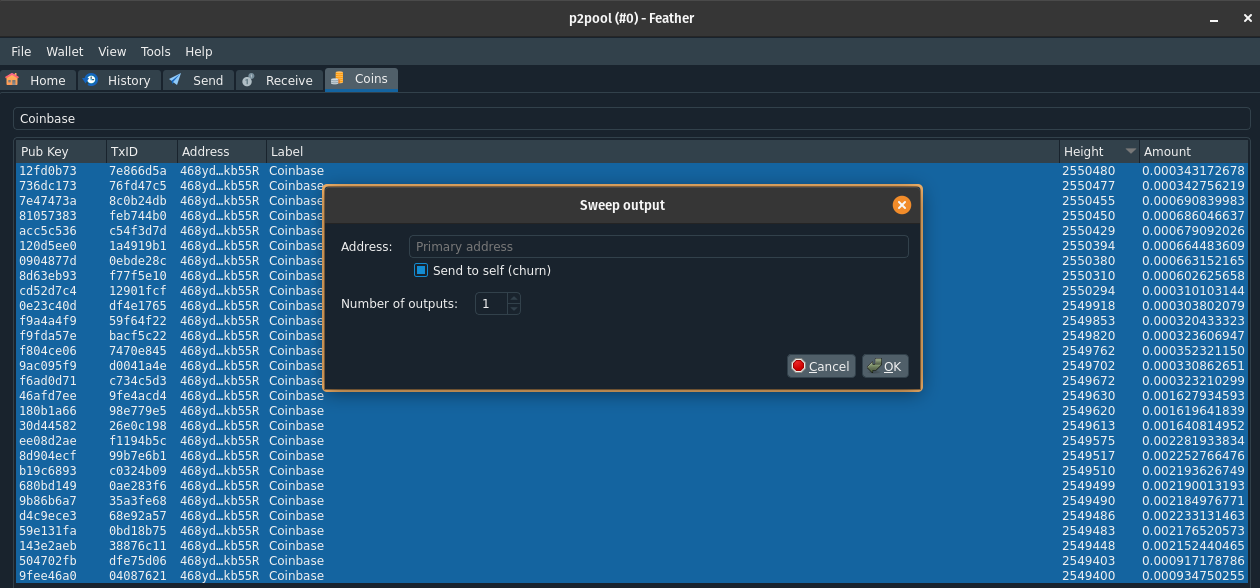
- On the popup, check the “Send to self” box and hit “OK”. This will combine all of the p2pool outputs and send them back into the same wallet.

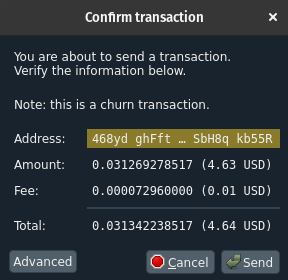
- Confirm the transaction on the next screen (note that the generation of the transaction can take a few seconds if you have a lot of outputs!)

- Alternatively, enter another address you own and send the combined outputs there
Resolving issues
While monerod is very stable and rarely has any issues, occasionally p2pool can get hung up and fail to function properly. If you do run into issues with p2pool not allowing you to mine against it, or being generally unresponsive, just run the following command to restart it and let it sync back up:
If you’re still having issues after giving that a few minutes to sync up, you can blow away p2pool and start the p2pool sync from scratch with the following commands:
If neither of these sets of commands resolve the issues, please file an issue in Github or reach out in Matrix (#monero-pow:matrix.org) for help.
Alternative ways to run p2pool
If you don’t prefer this approach or would like to build from source yourself, check out the following two approaches:
- Build from source and run the binaries directly: https://github.com/SChernykh/p2pool#build-instructions
- Use another Docker Compose setup that builds the images locally, removing any trust in my Docker images: https://github.com/WeebDataHoarder/p2pool-compose
There are many ways to get up and running, but I’ve built out the approach in this guide in an attempt to simplify the process for users. Feel free to use whatever approach you’re most comfortable with and that fits threat model!
Disclaimer
While this software has worked well for me and is good to go for mainnet, it is of course not foolproof and is still in active development. Be aware that bugs may exist and you’re very early to p2pool usage in general.
I am not responsible for any lost funds or issues you may have with configuration or running of p2pool, but will try to help as much as possible if you do run into issues.
Conclusion
Hopefully this has been a nice (relatively) simple guide to get you started mining Monero via p2pool! p2pool is an essential tool to removing trust from mining pools and removing the power of potential future regulation, so I’m beyond excited that it is finally possible and works quite well.
If you have specific questions or need some help, please reach out via Signal, SimpleX, X, or Nostr.
A pruned node allows you to run your own Monero node without requiring as much disk space. Please see the pruning Moneropedia entry for more info. ↩︎