In this guide I will lay out the detailed steps for how you can get started running your own Bitcoin mining pool. While it can seem incredibly daunting to do something like this, thanks to the work of the fantastic creator of public-pool, Benjamin Wilson, it’s easier than ever today.
I’ve taken the time to help “Dockerize” the public-pool code to allow you to run it without needing to compile from source. If you want to get into the nitty-gritty details of compilation and go that route, please take a look at the official repo for more info:
Pre-requisites
I will assume in this guide that you have purchased and SSH’d into the VPS/host of your choosing, as well as own a domain name you want to use to send people to the pool web UI and stratum interface.
If you’re using your own hardware at home, this guide will still generally apply to you assuming you are running Ubuntu/Debian.
Recommended hardware
- Pruned Node1
- 2+ vCPUs/cores
- 4GB+ RAM
- 75GB+ SSD
Why run your own Bitcoin node?
The Bitcoin network relies on a distributed web of Bitcoin nodes, each of which validate transactions, propagate transactions to the rest of the network, and helps new nodes easily and quickly synchronize to the current state of the network.
Running a Bitcoin node for yourself not only helps to give you the stronger network-level privacy guarantees, but also helps to increase the decentralization, stability, and speed of the Bitcoin network.
Each node can expose one powerful service:
- Peer-to-Peer (p2p) port (default 8333): this port allows other nodes on the network to connect to your node to download the blockchain and send you any transactions they validate that you do not yet have.
Deploying via Docker has a few key benefits, namely a simple and cross-OS compatible install along with automatic updates via Watchtower.
Why run and mine on an instance of public-pool instead of a “normal” Bitcoin pool?
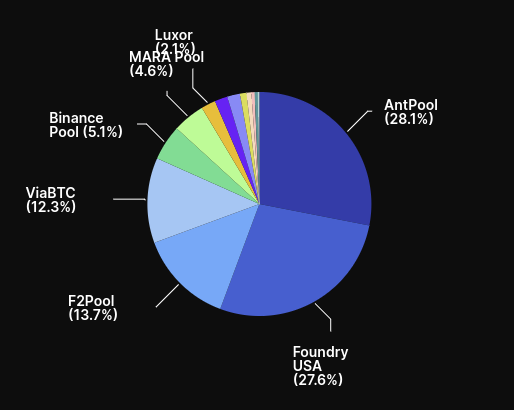
One of the critical issues facing the Bitcoin network today is pool centralization and censorship. At the moment of writing this guide, two pools control >51% of the network’s hashrate, making censorship and attack trivial if those pools worked together.
One of the most powerful things we can do as Bitcoin miners is opt out of the largest pools on the network and choose to point our hashrate at pools that are smaller, respect our views on censorship, etc. While there are some good small pools today, one way that those of us with a little more technical know-how can help is to spin up new pools for our friends, family, and digital communities to further decentralize the hashrate. This is especially powerful for those running mining hardware at home like BitAxe, where the low hashrate makes it unlikely to earn enough Bitcoin for payout on a large pool.
Enter solo mining – using public-pool anyone can point their miner at a pool and start solo mining on the Bitcoin network in seconds, essentially using their hashrate as a Bitcoin lottery ticket while helping to protect the network at the same time. public-pool is a powerful way to leverage your hashrate ideologically and look past blind, short-term profit and focus on the long-term success of freedom money.
Now let’s get started.
Update and install required packages
Install a few tools we will need later:
Install Docker:
Note: This command downloads a script and runs as root directly from Docker. Please make sure you are comfortable doing this, and be wary of doing this on a personal computer. If you’d like to avoid that, please follow the official docs here to install from the repository.
Initial hardening via UFW
We will want to make sure that the system is hardened in a simple way by making sure that the firewall is locked down to only allow access to the ports necessary for SSH, bitcoind, and public-pool using UFW.
A great intro to getting started with UFW is available on DigitalOcean.
Run the following commands to add some basic UFW rules and enable the firewall:
| |
Download and run bitcoind and public-pool via Docker
This section will use a simple Docker Compose configuration file that tells Docker exactly how each part needs to be configured and connected together.
This allows us to simplify down the launch of bitcoind and public-pool down to a few simple commands.
If you would like to inspect the source code behind the image used here or build it yourself, please see the below links:
Get the necessary files from Github and place them wherever you’d like, for this guide I will use
~/pool:Be sure to update the lines with
REPLACE_MEin them, all of which need you to specify the domain you want to use for your pool.These are all the lines that need to be replaced:
1 2 3 4 5 6 7 8 9 10 11 12 13 14 15# Line 16 # Replace with an email address where Let's Encrypt can reach you to alert you to certificates that are expiring for any reason. - "--certificatesresolvers.selfhostedservices.acme.email=REPLACE_ME" # Line 55 # Replace REPLACE_ME with the domain you want to use, i.e. pool.sethforprivacy.com - "traefik.http.routers.public-pool-api.rule=Host(`REPLACE_ME`) && PathPrefix(`/api`)" # Line 65 # Replace REPLACE_ME with the domain you want to use, i.e. pool.sethforprivacy.com - DOMAIN=REPLACE_ME # Line 68 # Replace REPLACE_ME with the domain you want to use, i.e. pool.sethforprivacy.com - "traefik.http.routers.public-pool-ui.rule=Host(`REPLACE_ME`)"To escape from the nano shell and save the file, hit
ctrl+x, thenyto save the file.Explanations of the containers used in the above
docker-compose.yamlfile:bitcoind: The Bitcoin daemon is the process that connects to the Bitcoin blockchain, synchronizes with other nodes on the network, and validates and keeps track of transactions happening in the Monero blockchain.public-pool: This is the actual pool process that watches the Bitcoin network viabitcoind, builds block templates based on the mempool, and provides those block templates as jobs directly to miners.public-pool-ui: This is the web UI that allows miners to see their statistics, view payouts, and keep track of the overall pool growth and usage.watchtower: This container keeps an eye out for new images for all other running containers, updating them immediately when new images are available. This container will ensure you never need to manually upgradebitcoindorpublic-pool, and will always be running the latest versions.
Copy the example
pool.env.examplefileBe sure to edit this file! You need to properly set a secure username and password to be used for Bitcoin RPC authentication, which will also be used in the next step’s
bitcoin.conffile. These are the lines that must be edited:Edit any other variables you’d like, but for most setups you don’t need to change anything else here.
Copy the example
bitcoin.conf.examplefile tobitcoin.confand set variables properlyBe sure to edit this file! You need to properly set a secure username and password to be used for Bitcoin RPC authentication. These are the lines that must be edited:
Start
bitcoindand allow it to sync fully:bitcoindcan take anywhere from 4-6h to a few days to sync fully, depending on your hardware.Watch the logs of
bitcoindto ensure it started and is synchronizing properlyYou should see lines the logging output slow from crazy fast mode to just outputting lines when connecting to new nodes or updating the chain tip with the latest block.
Once
bitcoindis fully synced, start up the other servicesWatch the logs of `public-pool`` to ensure it started and is synchronizing properly
You should see lines like
Bitcoin RPC connectedandStratum server is listening on port 3333.
If you already run a Bitcoin node
If you already run a node and don’t want to migrate to this Docker Compose setup, simply add the flag or config file line zmqpubrawblock=tcp://*:3000 to your bitcoind instance and restart it, forward port 3000/tcp (or whichever port you choose), use the below Docker Compose file, and update the pool.env file with the IP or DNS address of your existing node. To see the full steps, simply expand the collapsed section below:
Get the necessary files from Github and place them wherever you’d like, for this guide I will use Be sure to update the lines with These are all the lines that need to be replaced: To escape from the nano shell and save the file, hit Explanations of the containers used in the above Copy the example Be sure to edit this file! You need to properly set a secure username and password to be used for Bitcoin RPC authentication that you already have configured for your existing Edit any other variables you’d like, but for most setups you don’t need to change anything else here. Start up all services Watch the logs of public-pool to ensure it started and is synchronizing properly You should see lines like public-pool with remote node steps
~/pool:REPLACE_ME in them, all of which need you to specify the domain you want to use for your pool. 1
2
3
4
5
6
7
8
9
10
11
12
13
14
15
# Line 16
# Replace with an email address where Let's Encrypt can reach you to alert you to certificates that are expiring for any reason.
- "--certificatesresolvers.selfhostedservices.acme.email=REPLACE_ME"
# Line 44
# Replace REPLACE_ME with the domain you want to use, i.e. pool.sethforprivacy.com
- "traefik.http.routers.public-pool-api.rule=Host(`REPLACE_ME`) && PathPrefix(`/api`)"
# Line 54
# Replace REPLACE_ME with the domain you want to use, i.e. pool.sethforprivacy.com
- DOMAIN=REPLACE_ME
# Line 57
# Replace REPLACE_ME with the domain you want to use, i.e. pool.sethforprivacy.com
- "traefik.http.routers.public-pool-ui.rule=Host(`REPLACE_ME`)"
ctrl+x, then y to save the file.docker-compose-no-bitcoind.yaml file:public-pool: This is the actual pool process that watches the Bitcoin network via bitcoind, builds block templates based on the mempool, and provides those block templates as jobs directly to miners.public-pool-ui: This is the web UI that allows miners to see their statistics, view payouts, and keep track of the overall pool growth and usage.watchtower: This container keeps an eye out for new images for all other running containers, updating them immediately when new images are available. This container will ensure you never need to manually upgrade bitcoind or public-pool, and will always be running the latest versions.pool.env.example filebitcoind instance. These are the lines that must be edited: 1
2
3
4
5
6
7
8
9
10
11
12
13
14
15
16
# Line 1
# Replace "http://bitcoind" with the correct protocol and domain/IP address for your Bitcoin node, i.e. http:node.sethforprivacy.com
BITCOIN_RPC_URL=http://bitcoind
# Line 2-3
# Replace with the proper bitcoind RPC auth credentials
BITCOIN_RPC_USER=bitcoin
BITCOIN_RPC_PASSWORD=bitcoin
# Line 4
# Replace (if necessary) with the proper RPC port of your bitcoind instance
BITCOIN_RPC_PORT=8332
# Line 6
# Replace "tcp://bitcoind:3000" with the proper address and zmqpubrawblock port of your bitcoind instance, i.e. tcp://node.sethforprivacy.com:3000
BITCOIN_ZMQ_HOST="tcp://bitcoind:3000"
Bitcoin RPC connected and Stratum server is listening on port 3333.
Connecting your miners
Now that you have a working pool properly set up, connecting your miners is trivial! Just point them to your specific domain and stratum port, i.e.:
stratum+tcp://pool.sethforprivacy.com:3333
Or for miners that don’t accept/handle the stratum+tcp:// prefix:
pool.sethforprivacy.com:3333
You should see your miner start getting work immediately, and can watch the worker join the pool in your logs:
You’ll see logs like this for every client that joins:
public-pool | New client ID: : 11aaf9cc, ::ffff:1.2.3.4:57060
Credit
Please note that all credit here belongs to the fantastic creator of public-pool, Benjamin Wilson. If you appreciate the ability to easily spin up your own pool in a few minutes with 100% FOSS code, please consider taking a moment and sending him a donation for his time! You can find his donation details on the bottom of his pool instance (and any other pools that are created this way):
Conclusion
I hope this guide will help to spawn many more “Uncle Jim” style pools for small communities to be able to easily come together and point their hash at a pool that follows their principles, further decentralizing the Bitcoin network.
If you have specific questions or need some help, please reach out via Signal, SimpleX, or Nostr.
A pruned node allows you to run your own Bitcoin node without requiring as much disk space. ↩︎